Introduction
Introduction to Undertow
Undertow is a web server designed to be used for both blocking and non-blocking tasks. Some of its main features are:
-
High Performance
-
Embeddable
-
Servlet 3.1
-
Web Sockets
-
Reverse Proxy
There and two main ways that Undertow can be used, either by directly embedding it in your code, or as part of the Wildfly Application Server. This guide mostly focuses on the embedded API’s, although a lot of the content is still relevant if you are using Wildfly, it is just that the relevant functionality will generally be exposed via XML configuration rather than programatic configuration.
The documentation is broken up into two parts, the first part focuses on Undertow code, while the second focuses on Servlet.
Undertow Core
Bootstrapping Undertow
There are two ways to bootstrap Undertow. The first and most simple is to use the io.undertow.Undertow builder API.
The second is to assemble a server using XNIO and the Undertow listener classes directly. This second approach requires
more code, but gives more flexibility. It is anticipated that for most use cases the builder API will be sufficient.
One thing that it is important to understand about Undertow is that there is not really any concept of an Undertow container. Undertow applications are assembled from multiple handler classes, and it is up to the embedding application to manage the lifecycle of all the these handlers. This was a deliberate design decision in order to give the embedding application as much control as possible. This is generally only an issue if you have handlers that hold resources that need to be cleaned up at server stop.
The Builder API
The builder API is accessed using the io.undertow.Undertow class. We will start by looking at a simple example:
public class HelloWorldServer {

    public static void main(final String[] args) {
        Undertow server = Undertow.builder()
                .addHttpListener(8080, "localhost")
                .setHandler(new HttpHandler() {
                    @Override
                    public void handleRequest(final HttpServerExchange exchange) throws Exception {
                        exchange.getResponseHeaders().put(Headers.CONTENT_TYPE, "text/plain");
                        exchange.getResponseSender().send("Hello World");
                    }
                }).build();
        server.start();
    }
}
The above example starts a simple server that returns Hello World to all requests. The server will listen on the
localhost address on port 8080 until the server.stop() method is called. When requests arrive they will be handled
by the first (and only) handler in the handler chain, which in this case simply sets a header and writes some content
(more information on handlers can be found in the handlers guide.
The builder will try and pick sensible defaults for all performance related parameters such as number of threads and buffer sizes, however all these can be overridden directly using the builder. These options and their effects are detailed in the listeners guide, and will not be repeated here.
Note that because of the flexibility of Undertow there are likely several general purpose handlers that you will always want to include in your server (e.g. the date handler, that adds a date header to all responses). For more information see the handlers guide.
Assembling a Server Manually
If you do not want to use the builder API then there are a few steps that you need to follow to create a server:
-
Create an XNIO Worker
-
Create an XNIO SSL instance (optional)
-
Create an instance of the relevant Undertow listener class
-
Open a server socket using XNIO and set its accept listener
The code for HTTP, HTTPS and AJP listeners is shown below:
Xnio xnio = Xnio.getInstance();

XnioWorker worker = xnio.createWorker(OptionMap.builder()
        .set(Options.WORKER_IO_THREADS, ioThreads)
        .set(Options.WORKER_TASK_CORE_THREADS, workerThreads)
        .set(Options.WORKER_TASK_MAX_THREADS, workerThreads)
        .set(Options.TCP_NODELAY, true)
        .getMap());

OptionMap socketOptions = OptionMap.builder()
        .set(Options.WORKER_IO_THREADS, ioThreads)
        .set(Options.TCP_NODELAY, true)
        .set(Options.REUSE_ADDRESSES, true)
        .getMap();

Pool<ByteBuffer> buffers = new ByteBufferSlicePool(BufferAllocator.DIRECT_BYTE_BUFFER_ALLOCATOR,bufferSize, bufferSize * buffersPerRegion);


if (listener.type == ListenerType.AJP) {
    AjpOpenListener openListener = new AjpOpenListener(buffers, serverOptions, bufferSize);
    openListener.setRootHandler(rootHandler);
    ChannelListener<AcceptingChannel<StreamConnection>> acceptListener = ChannelListeners.openListenerAdapter(openListener);
    AcceptingChannel<? extends StreamConnection> server = worker.createStreamConnectionServer(new InetSocketAddress(Inet4Address.getByName(listener.host), listener.port), acceptListener, socketOptions);
    server.resumeAccepts();
} else if (listener.type == ListenerType.HTTP) {
    HttpOpenListener openListener = new HttpOpenListener(buffers, OptionMap.builder().set(UndertowOptions.BUFFER_PIPELINED_DATA, true).addAll(serverOptions).getMap(), bufferSize);
    openListener.setRootHandler(rootHandler);
    ChannelListener<AcceptingChannel<StreamConnection>> acceptListener = ChannelListeners.openListenerAdapter(openListener);
    AcceptingChannel<? extends StreamConnection> server = worker.createStreamConnectionServer(new InetSocketAddress(Inet4Address.getByName(listener.host), listener.port), acceptListener, socketOptions);
    server.resumeAccepts();
} else if (listener.type == ListenerType.HTTPS){
    HttpOpenListener openListener = new HttpOpenListener(buffers, OptionMap.builder().set(UndertowOptions.BUFFER_PIPELINED_DATA, true).addAll(serverOptions).getMap(), bufferSize);
    openListener.setRootHandler(rootHandler);
    ChannelListener<AcceptingChannel<StreamConnection>> acceptListener = ChannelListeners.openListenerAdapter(openListener);
    XnioSsl xnioSsl;
    if(listener.sslContext != null) {
        xnioSsl = new JsseXnioSsl(xnio, OptionMap.create(Options.USE_DIRECT_BUFFERS, true), listener.sslContext);
    } else {
        xnioSsl = xnio.getSslProvider(listener.keyManagers, listener.trustManagers, OptionMap.create(Options.USE_DIRECT_BUFFERS, true));
    }
    AcceptingChannel <SslConnection> sslServer = xnioSsl.createSslConnectionServer(worker, new InetSocketAddress(Inet4Address.getByName(listener.host), listener.port), (ChannelListener) acceptListener, socketOptions);
    sslServer.resumeAccepts();
}
As you can see it is quite a bit more code than just using the builder, however it does provide some flexibility that the builder does not:
-
Complete control over all options
-
Ability to use different buffer pools and workers for each listener
-
XnioWorker instances can be shared between different server instances
-
Buffer pools can be shared between different server instances
-
Listeners can be given different root handlers
In most cases this level of control is not necessary, and it is better to simply use the builder API.
Architecture Overview
This provides a general overview of Undertow’s architecture. It is not intended to be a comprehensive guide.
On thing that makes Undertow unique is that it has no concept of a global container. Instead an Undertow server is assembled by the embedding application. This makes Undertow extremely flexible, and the embedding application can basically just pick the parts that they need, and assemble them in whatever way makes sense.
An Undertow server is basically composed of three things, one (or more) XNIO worker instance, one or more connectors, and a handler chain to handle incoming requests.
XNIO
Undertow is based on XNIO. The XNIO project provides a thin abstraction layer over Java NIO. In particular it provides the following:
Channel API
XNIO provides a channel abstraction, that abstracts away the underlying transport. Channels are notified of events
using the ChannelListener API, and do not have to deal with NIO interest OPs directly. At creation time channels are
assigned an IO Thread. This is the thread that will be used to execute all ChannelListener invocations for the channel.
Management of IO and Worker threads
The XNIO worker manages both the IO threads, and a thread pool that can be used for blocking tasks. In general non-blocking handlers will run from withing an IO thread, while blocking tasks such as Servlet invocations will be dispatched to the worker thread pool.
IO threads run in a loop. This loop does three things:
-
Run any tasks that have been scheduled for execution by the IO thread
-
Run any scheduled tasks that that have hit their timeout
-
Call Selector.select(), and then invoke any callbacks for selected keys
SSL Support
XNIO also provides support for SSL, that provides the basis for Undertows SSL implementation.
Listeners
The concept of a listener in Undertow is basically the part of Undertow that handles incoming connections, and the underlying wire protocol. By default Undertow ships with 3 different listeners:
-
HTTP
-
HTTPS
-
AJP
Support for SPDY is planned, and should be coming soon.
These connectors basically take the form of two XNIO listeners, an open listener and a read listener. The open listener is invoked when a connection is first received. This listener will do any work required to setup the connection, and then pass this off to the read listener. The read listener is responsible for parsing the incoming request into a HttpServerExchange object, setting up any protocol specific state that is required, and delegating to the first handler in the handler chain. When the request is done the read listener is invoked again (assuming persistent connections are in use), and the process is repeated.
Connectors are tied to an XNIO worker. If multiple connectors are setup to invoke the same handler chain they may share a Worker, or they may have separate workers, depending on how they have been configured.
In general it should not matter to your application the type of connector that is in use, the exception being that not all connectors support all features. For example AJP does not support HTTP upgrade.
For more information on listeners see the listeners guide.
Handlers
The main Undertow functionality is provided by io.undertow.server.HttpHandler instances. These handlers can be chained
together to form a complete server.
The HttpHandler interface is quite simple:
public interface HttpHandler {

    void handleRequest(HttpServerExchange exchange) throws Exception;
}
Handlers are generally chained together by explicitly specifying the next handler at construction time, there is no pipeline concept, which means that a handler can pick the next handler to invoke based on the current request. A typical handler might look something like this:
public class SetHeaderHandler implements HttpHandler {

    private final HttpString header;
    private final String value;
    private final HttpHandler next;

    public SetHeaderHandler(final HttpHandler next, final String header, final String value) {
        this.next = next;
        this.value = value;
        this.header = new HttpString(header);
    }

    @Override
    public void handleRequest(final HttpServerExchange exchange) throws Exception {
        exchange.getResponseHeaders().put(header, value);
        next.handleRequest(exchange);
    }
}
Listeners
Listeners represent the entry point of an Undertow application. All incoming requests will come through a listener, and
a listener is responsible for translating a request into an instance of the HttpServerExchange object, and then
turning the result into a response that can be sent back to the client.
Undertow provides 4 built in listener types, HTTP, AJP, SPDY and HTTP2. HTTPS is provides by using the HTTP listener with an SSL enabled connection.
Note that it is expected that now that HTTP2 is out it is expected that SPDY will be deprecated and eventually removed.
XNIO workers
All listeners are tied to an XNIO Worker instance. Usually there will only be a single worker instance that is shared between listeners, however it is possible to create a new worker for each listener.
The worker instance manages the listeners IO threads, and also the default blocking task thread pool. There are several main XNIO worker options that affect listener behaviour. These option can either be specified on the Undertow builder as worker options, or at worker creating time if you are bootstrapping a server manually. These options all reside on the org.xnio.Options class.
- WORKER_IO_THREADS
-
The number of IO threads to create. IO threads perform non blocking tasks, and should never perform blocking operations because they are responsible for multiple connections, so while the operation is blocking other connections will essentially hang. One IO thread per CPU core is a reasonable default.
- WORKER_TASK_CORE_THREADS
-
The number of threads in the workers blocking task thread pool. When performing blocking operations such as Servlet requests threads from this pool will be used. In general it is hard to give a reasonable default for this, as it depends on the server workload. Generally this should be reasonably high, at least 10 per CPU core.
Buffer Pool
All listeners have a buffer pool, which is used to allocate pooled NIO ByteBuffer instances. These buffers are used
for IO operations, and the buffer size has a big impact on application performance. For servers the ideal size is
generally 16k, as this is usually the maximum amount of data that can be written out via a write() operation
(depending on the network setting of the operating system). Smaller systems may want to use smaller buffers to save
memory.
In some situations with blocking IO the buffer size will determine if a response is sent using chunked encoding or has a
fixed content length. If a response fits completely in the buffer and flush() is not called then a content length can
be set automatically.
Common Listener Options
In addition to the worker options the listeners take some other options that control server behaviour. These are all
part of the io.undertow.UndertowOptions class. Some of of these only make sense for specific protocols. You can set
options with the Undertow.Builder.setServerOption:
- MAX_HEADER_SIZE
-
The maximum size of a HTTP header block, in bytes. If a client sends more data that this as part of the request header then the connection will be closed. Defaults to 50k.
- MAX_ENTITY_SIZE
-
The default maximum size of a request entity. If entity body is larger than this limit then a
java.io.IOExceptionwill be thrown at some point when reading the request (on the first read for fixed length requests, when too much data has been read for chunked requests). This value is only the default size, it is possible for a handler to override this for an individual request by callingio.undertow.server.HttpServerExchange.setMaxEntitySize(long size). Defaults to unlimited. - MAX_PARAMETERS
-
The maximum number of query parameters that are permitted in a request. If a client sends more than this number the connection will be closed. This limit is necessary to protect against hash based denial of service attacks. Defaults to 1000.
- MAX_HEADERS
-
The maximum number of headers that are permitted in a request. If a client sends more than this number the connection will be closed. This limit is necessary to protect against hash based denial of service attacks. Defaults to 200.
- MAX_COOKIES
-
The maximum number of cookies that are permitted in a request. If a client sends more than this number the connection will be closed. This limit is necessary to protect against hash based denial of service attacks. Defaults to 200.
- URL_CHARSET
-
The charset to use to decode the URL and query parameters. Defaults to UTF-8.
- DECODE_URL
-
Determines if the listener will decode the URL and query parameters, or simply pass it through to the handler chain as is. If this is set url encoded characters will be decoded to the charset specified in URL_CHARSET. Defaults to true.
- ALLOW_ENCODED_SLASH
-
If a request comes in with encoded / characters (i.e. %2F), will these be decoded. This can cause security problems (https://cve.mitre.org/cgi-bin/cvename.cgi?name=CVE-2007-0450) if a front end proxy does not perform the same decoding, and as a result this is disabled by default.
- ALLOW_EQUALS_IN_COOKIE_VALUE
-
If this is true then Undertow will allow non-escaped equals characters in unquoted cookie values. Unquoted cookie values may not contain equals characters. If present the value ends before the equals sign. The remainder of the cookie value will be dropped. Defaults to false.
- ALWAYS_SET_DATE
-
If the server should add a HTTP
Dateheader to all response entities which do not already have one. The server sets the header right before writing the response, if none was set by a handler before. Unlike theDateHandlerit will not overwrite the header. The current date string is cached, and is updated every second. Defaults to true. - ALWAYS_SET_KEEP_ALIVE
-
If a HTTP
Connection: keep-aliveheader should always be set, even for HTTP/1.1 requests that are persistent by default. Even though the spec does not require this header to always be sent it seems safer to always send it. If you are writing some kind of super high performance application and are worried about the extra data being sent over the wire this option allows you to turn it off. Defaults to true. - MAX_BUFFERED_REQUEST_SIZE
-
The maximum size of a request that can be saved in bytes. Requests are buffered in a few situations, the main ones being SSL renegotiation and saving post data when using FORM based auth. Defaults to 16,384 bytes.
- RECORD_REQUEST_START_TIME
-
If the server should record the start time of a HTTP request. This is necessary if you wish to log or otherwise use the total request time, however has a slight performance impact, as it means that
System.nanoTime()must be called for each request. Defaults to false. - IDLE_TIMEOUT
-
The amount of time a connection can be idle for before it is timed out. An idle connection is a connection that has had no data transfer in the idle timeout period. Note that this is a fairly coarse grained approach, and small values will cause problems for requests with a long processing time.
- REQUEST_PARSE_TIMEOUT
-
How long a request can spend in the parsing phase before it is timed out. This timer is started when the first bytes of a request are read, and finishes once all the headers have been parsed.
- NO_REQUEST_TIMEOUT
-
The amount of time a connection can sit idle without processing a request, before it is closed by the server.
- ENABLE_CONNECTOR_STATISTICS
-
If this is true then the connector will record statistics such as requests processed and bytes sent/received. This has a performance impact, although it should not be noticeable in most cases.
ALPN
io.undertow.server.protocol.http.AlpnOpenListener
Note that the HTTP2 and SPDY connectors require the use of ALPN. Unfortunatly java does not provide a standard way of performing ALPN at this time, so it is necessary to run java with a 3rd party ALPN library on the boot class path. For more information see the Jetty ALPN documentation.
SPDY and HTTP2 should use the ALPN open listener to handle the ALPN protocol negotiation.
HTTP Listener
io.undertow.server.protocol.http.HttpOpenListener
The HTTP listener is the most commonly used listener type, and deals with HTTP/1.0 and HTTP/1.1. It only takes one additional option.
- ENABLE_HTTP2
-
If this is true then the connection can be processed as a HTTP2 prior knowledge connection. If a HTTP2 connects directly to the listener with a HTTP2 connection preface then the HTTP2 protocol will be used instead of HTTP/1.1.
AJP Listener
io.undertow.server.protocol.ajp.AjpOpenListener
The AJP listener allows the use of the AJP protocol, as used by the apache modules mod_jk and mod_proxy_ajp. It is a binary protocol that is slightly more efficient protocol than HTTP, as some common strings are replaced by integers. If the front end load balancer supports it then it is recommended to use HTTP2 instead, as it is both a standard protocol and more efficient.
Built in Handlers
Undertow contains a number of build in handlers that provide common functionality. Most of these handlers can be created
using static methods on the io.undertow.Handlers utility class.
The most common of these handlers are detailed below.
- Path
-
The path matching handler allows you to delegate to a handler based on the path of the request. It can match on either an exact path or a path prefix, and will update the exchanges relative path based on the selected path. Paths are first checked against an exact match, and then via longest prefix match.
- Virtual Host
-
This handler delegates to a handler based on the contents of the
Host:header, which allows you to select a different chain to handle different hosts. - Path Template
-
Similar to the path handler, however the path template handler allows you to use URI template expressions in the path, for example /rest/{name}. The value of the relevant path template items are stored as an attachment on the exchange, under the
io.undertow.server.handlers.PathTemplateHandler#PATH_TEMPLATE_MATCHattachment key. - Date
-
This handler sets the
Date:header as required by the HTTP RFC. In order to avoid formatting a new date each time dates are accurate to the nearest second. - Resource
-
The resource handler is used to serve static resources such as files. This handler takes a
ResourceManagerinstance, that is basically a file system abstraction. Undertow provides file system and class path based resource mangers, as well as a caching resource manager that wraps an existing resource manager to provide in memory caching support. - Predicate
-
The predicate handler picks between two possible handlers based on the value of a predicate that is resolved against the exchange. For more information see the predicates guide.
- HTTP Continue
-
There are multiple handlers that deal with requests that expect a HTTP 100 Continue response. The HTTP Continue Read Handler will automatically send a continue response for requests that require it the first time a handler attempts to read the request body. The HTTP Continue Accepting handler will immediately either send a 100 or a 417 response depending on the value of a predicate. If no predicate is supplied it all immediately accept all requests. If a 417 response code is send the next handler is not invoked and the request will be changed to be non persistent.
- Websocket
-
Handler that handles incoming web socket connections. See the websockets guide for details.
- Redirect
-
A handler that redirects to a specified location.
- Trace
-
A handler that handles HTTP TRACE requests, as specified by the HTTP RFC.
- Header
-
A handler that sets a response header.
- IP Access Control
-
A handler that allows or disallows a request based on the IP address of the remote peer.
- ACL
-
A handler that allows or disallows a request based on an access control list. Any attribute of the exchange can be used as the basis of this comparison.
- URL Decoding
-
A handler that decodes the URL and query parameters into a specified charset. It may be that different resources may require a different charset for the URL. In this case it is possible to set the Undertow listener to not decode the URL, and instead multiple instances of this handler at an appropriate point in the handler chain. For example this could allow you to have different virtual hosts use different URL encodings.
- Set Attribute
-
Sets an arbitrary attribute on the exchange. Both the attribute and the value are specified as exchange attributes, so this handler can essentially be used to modify any part of the exchange. For more information see the section on exchange attributes.
- Rewrite
-
Handler that provides URL rewrite support.
- Graceful Shutdown
-
Returns a handler that can be used to make sure all running requests are finished before the server shuts down. This handler tracks running requests, and will reject new ones once shutdown has started.
- Proxy Peer Address
-
This handler can be used by servers that are behind a reverse proxy. It will modify the exchanges peer address and protocol to match that of the X-Forwarded-* headers that are sent by the reverse proxy. This means downstream handlers will see that actual clients peer address, rather than that of the proxy.
- Request Limiting Handler
-
Handler that limits the number of concurrent requests. If the number exceeds the limit requests are queued. If the queue fills up then requests are rejected.
Undertow Handler Authors Guide
This guide provides an overview of how to write native handlers for Undertow. It does not cover every API method
on the HttpServerExchange object, as many of them are self explanatory or covered by the javadoc. Instead
this guide focuses on the concepts you will need to write an Undertow handler.
Lets start with a simple example:
public class HelloWorldServer {

    public static void main(final String[] args) {
        Undertow server = Undertow.builder()                                                    //Undertow builder
                .addListener(8080, "localhost")                                                 //Listener binding
                .setHandler(new HttpHandler() {                                                 //Default Handler
                    @Override
                    public void handleRequest(final HttpServerExchange exchange) throws Exception {
                        exchange.getResponseHeaders().put(Headers.CONTENT_TYPE, "text/plain");  //Response Headers
                        exchange.getResponseSender().send("Hello World");                       //Response Sender
                    }
                }).build();
        server.start();
    }

}
For the most part this is all fairly self explanatory:
- The Undertow Builder
-
This API enables you to quickly configure and launch an Undertow server. It is intended for use is embedded and testing environments. At this stage the API is still subject to change.
- Listener Binding
-
The next line tells the Undertow server to bind to localhost on port 8080.
- Default Handler
-
This is the handler that will be matched if a URL does not match any of the paths that are registered with Undertow. In this case we do not have any other handlers registered, so this handler is always invoked.
- Response Headers
-
This sets the content type header, which is fairly self explanatory. One thing to note is that Undertow does not use
Stringas the key for the header map, but rather a case insensitive stringio.undertow.util.HttpString. Theio.undertow.utils.Headersclass contains predefined constants for all common headers. - Response Sender
-
The Undertow sender API is just one way of sending a response. The sender will be covered in more detail later, but in this case as no completion callback has been specified the sender knows that the provided string is the complete response, and as such will set a content length header for us and close the response when done.
From now on our code examples will focus on the handlers themselves, and not on the code to setup a server.
Request Lifecycle
(This is also covered in the Request Lifecycle document.)
When a client connects to the server Undertow creates a io.undertow.server.HttpServerConnection. When the client sends
a request it is parsed by the Undertow parser, and then the resulting io.undertow.server.HttpServerExchange is passed
to the root handler. When the root handler finishes one of 4 things can happen:
- The exchange can be already completed
-
And exchange is considered complete if both request and response channels have been fully read/written. For requests with no content (such as GET and HEAD) the request side is automatically considered fully read. The read side is considered complete when a handler has written out the full response and closed and fully flushed the response channel. If an exchange is already complete then no action is taken, as the exchange is finished.
- The root handler returns normally without completing the exchange
-
In this case the exchange will be completed by calling
HttpServerExchange.endExchange(). The semantics ofendExchange()are discussed later. - The root handler returns with an Exception
-
In this case a response code of
500will be set, and the exchange will be ended usingHttpServerExchange.endExchange(). - The root handler can return after
HttpServerExchange.dispatch()has been called, or after async IO has been started -
In this case the dispatched task will be submitted to the dispatch executor, or if async IO has been started on either the request or response channels then this will be started. In this case the exchange will not be finished, it is up to your async task to finish the exchange when it is done processing.
By far the most common use of HttpServerExchange.dispatch() is to move execution from an IO thread where blocking is not
allowed into a worker thread, which does allow for blocking operations. This pattern generally looks like:
public void handleRequest(final HttpServerExchange exchange) throws Exception {
    if (exchange.isInIoThread()) {
      exchange.dispatch(this);
      return;
    }
    //handler code
}
Because exchange is not actually dispatched until the call stack returns you can be sure that more that one thread is never active in an exchange at once. The exchange is not thread safe, however it can be passed between multiple threads as long as both threads do not attempt to modify it at once, and there is a happens before action (such as a thread pool dispatch) in between the first and second thread access.
Ending the exchange
As mentioned above, and exchange is considered done once both the request and response channels have been closed and flushed.
There are two ways to end an exchange, either by fully reading the request channel, and calling shutdownWrites() on the
response channel and then flushing it, or by calling HttpServerExchange.endExchange(). When endExchange() is called
Undertow will check if and content has been generated yet, if it has then it will simply drain the request channel, and
close and flush the response channel. If not and there are any default response listeners registered on the exchange
then Undertow will give each of them a chance to generate a default response. This mechanism is how default error pages
are generated.
The Undertow Buffer Pool
As Undertow is based on NIO it uses java.nio.ByteBuffer whenever buffering is needed. These buffers are pooled, and
should not be allocated on demand as this will severely impact performance. The buffer pool can be obtained by calling
HttpServerConnection.getBufferPool().
Pooled buffers must be freed after use, as they will not be cleaned up by the garbage collector. The size of the buffers in the pool is configured when the server is created. Empirical testing has shown that if direct buffers are being used 16kb buffers are optimal if maximum performance is required (as this corresponds to the default socket buffer size on Linux).
Non-blocking IO
By default Undertow uses non-blocking XNIO channels, and requests initially start off in an XNIO IO thread. These channels can be used directly to send a receive data. These channels are quite low level however, so to that end Undertow provides some abstractions to make using them a little bit easier.
The easiest way to send a response using non-blocking IO is to use the sender API as shown above. It contains several
versions of the send() method for both byte and String data. Some versions of the method take a callback that is
invoked when the send is complete, other versions do not take a callback and instead end the exchange when the send is
complete.
Note that the sender API does not support queueing, you may not call send() again until after the callback has been
notified.
When using versions of the send() method that do not take a callback the Content-Length header will be automatically
set, otherwise you must set this yourself to avoid using chunked encoding.
The sender API also supports blocking IO, if the exchange has been put into blocking mode by invoking
HttpServerExchange.startBlocking() then the Sender will send its data using the exchanges output stream.
Blocking IO
Undertow provides full support for blocking IO. It is not advisable to use blocking IO in an XNIO worker thread, so you will need to make sure that the request has been dispatched to a worker thread pool before attempting to read or write.
The code to dispatch to a worker thread can be found above.
To begin blocking IO call HttpServerExchange.startBlocking(). There are two versions of this method, the one which
does not take any parameters which will use Undertow’s default stream implementations, and
HttpServerExchange.startBlocking(BlockingHttpServerExchange blockingExchange) which allows you to customise the
streams that are in use. For example the servlet implementation uses the second method to replace Undertow’s default
streams with Servlet(Input/Output)Stream implementations.
Once the exchange has been but into blocking mode you can now call HttpServerExchange.getInputStream() and
HttpServerExchange.getOutputStream(), and write data to them as normal. You can also still use the sender API
described above, however in this case the sender implementation will use blocking IO.
By default Undertow uses buffering streams, using buffers taken from the buffer pool. If a response is small enough
to fit in the buffer then a Content-Length header will automatically be set.
Headers
Request and response headers are accessible through the HttpServerExchange.getRequestHeaders() and
HttpServerExchange.getResponseHeaders() methods. These methods return a HeaderMap, an optimised map implementation.
Headers are written out with the HTTP response header when the first data is written to the underlying channel (this may not be the same time as the first time data is written if buffering is used).
If you wish to force the headers to be written you can call the flush() method on either the response channel or stream.
HTTP Upgrade
In order to perform a HTTP upgrade you can call
HttpServerExchange.upgradeChannel(ExchangeCompletionListener upgradeCompleteListener), the response code will be set
to 101, and once the exchange is complete your listener will be notified. Your handler is responsible for setting
any appropriate headers that the upgrade client will be expecting.
Undertow Request Lifecyle
This document covers the lifecycle of a web request from the point of view of the Undertow server.
When a connection is established XNIO invokes the io.undertow.server.HttpOpenListener, this listener
creates a new io.undertow.server.HttpServerConnection to hold state associated with this connection,
and then invokes io.undertow.server.HttpReadListener.
The HTTP read listener is responsible for parsing the incoming request, and creating a new
io.undertow.server.HttpServerExchange to store the request state. The exchange object contains both the request
and response state.
At this point the request and response channel wrappers are setup, that are responsible for decoding and encoding the request and response data.
The root handler is then executed via io.undertow.server.HttpHandlers#executeRootHandler. Handlers are chained
together, and each handler can modify the exchange, send a response, or delegate to a different handler. At this point
there are a few different things that can happen:
-
The exchange can be finished. This happens when both the request and response channels are closed. If a content length is set then the channel will automatically close once all the data has been written. This can also be forced by calling
HttpServerExchange.endExchange(), and if no data has been written yet any default response listeners that have been registered with the exchange will be given the opportunity to generate a default response, such as an error page. Once the current exchange is finished the exchange completion listeners will be run. The last completion listener will generally start processing the next request on the connection, and will have been setup by the read listener. -
The exchange can be dispatched by calling one of the
HttpServerExchange.dispatchmethods. This is similar to the servletstartAsync()method. Once the call stack returns then the dispatch task (if any) will be run in the provided executor (if no executor is provided it will be ran by the XNIO worker). The most common use of a dispatch is to move from executing in an IO thread (where blocking operations are not allowed), to a worker thread that can block. This pattern looks like:
public void handleRequest(final HttpServerExchange exchange) throws Exception {
    if (exchange.isInIoThread()) {
      exchange.dispatch(this);
      return;
    }
    //handler code
}-
Reads/Writes can be resumed on a request or response channel. Internally this is treated like a dispatch, and once the call stack returns the relevant channel will be notified about IO events. The reason why the operation does not take effect until the call stack returns is to make sure that we never have multiple threads acting in the same exchange.
-
The call stack can return without the exchange being dispatched. If this happens
HttpServerExchange.endExchange()will be called, and the request will be finished. -
An exception can be thrown. If this propagates all the way up the call stack the exchange will be ended with a 500 response code.
Error Handling
Error handling is accomplished by through the use of default response listeners. These are listeners that can generate a response if the exchange is ended without a response being sent.
| This is completely different to Servlet error handling. Servlet error handling is implemented as part of Undertow Servlet, and follows the standard Servlet rules. |
In general there are two types of errors that we need to worry about, handlers that throw exceptions or handlers that
set an error response code and then call HttpServerExchange.endExchange().
Exceptions
The easiest way to handle exceptions is to catch them in an outer handler. For example:
public class ErrorHandler implements HttpHandler {

    @Override
    public void handleRequest(final HttpServerExchange exchange) throws Exception {
        try {
            next.handleRequest(exchange);
        } catch (Exception e) {
            if(exchange.isResponseChannelAvailable()) {
                //handle error
            }
        }
    }
}
The allows you application to handle exceptions in whatever manner you see fit.
If the exception propagates out of the handler chain a 500 response code will be set and the exchange can be ended.
Default Response Listeners
Default response listener allow you to generate a default page if the exchange is ended without a response body. These handlers should test for an error response code, and then generate an appropriate error page.
Note that these handlers will be run for all requests that terminate with no content, but generating default content for successful requests will likely cause problems.
Default response listeners can be registered via the
HttpServerExchange#addDefaultResponseListener(DefaultResponseListener) method. They will be called in the reverse order
that they are registered, so the last handler registered is the first to be called.
The following example shows a handler that will generate a simple next based error page for 500 errors:
public class SimpleErrorPageHandler implements HttpHandler {

    private final HttpHandler next;

    public SimpleErrorPageHandler(final HttpHandler next) {
        this.next = next;
    }

    @Override
    public void handleRequest(final HttpServerExchange exchange) throws Exception {
        exchange.addDefaultResponseListener(new DefaultResponseListener() {
            @Override
            public boolean handleDefaultResponse(final HttpServerExchange exchange) {
                if (!exchange.isResponseChannelAvailable()) {
                    return false;
                }
                Set<Integer> codes = responseCodes;
                if (exchange.getResponseCode() == 500) {
                    final String errorPage = "<html><head><title>Error</title></head><body>Internal Error</body></html>";
                    exchange.getResponseHeaders().put(Headers.CONTENT_LENGTH, "" + errorPage.length());
                    exchange.getResponseHeaders().put(Headers.CONTENT_TYPE, "text/html");
                    Sender sender = exchange.getResponseSender();
                    sender.send(errorPage);
                    return true;
                }
                return false;
            }
        });
        next.handleRequest(exchange);
    }
}
Security
Undertow has a flexible security architecture that provides several built in authentication mechanisms, as well as providing an API to allow you to provide custom mechanisms. Mechanisms can be combined (as much as the relevant specifications allow). This document covers the details of the core Undertow security API. For details on how these are used in servlet deployments see Servlet Security.
The SecurityContext
The core of Undertow’s security architecture is the SecurityContext. It is accessible via the
HttpServerExchange.getSecurityContext() method. The security context is responsible for maintaining
all security related state for the request, including configured authentication mechanisms and the
current authenticated user.
Security Handlers
Security within Undertow is implemented as a set of asynchronous handlers and a set of authentication mechanisms co-ordinated by these handlers.
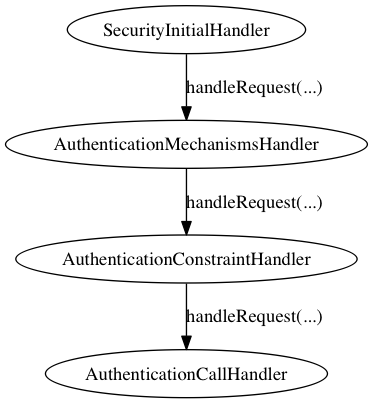
Early in the call chain is a handler called SecurityInitialHandler, this is where the security processing
beings, this handler ensures that an empty SecurityContext is set on the current HttpServerExchange
-
Allow authentication to occur in the call as early as possible.
-
Allows for use of the mechanisms in numerous scenarios and not just for servlets.
The SecurityContext is responsible for both holding the state related to the currently authenticated user
and also for holding the configured mechanisms for authentication (AuthenticationMechanism) and providing
methods to work with both of these. As this SecurityContext is replacable a general configuration
can be applied to a complete server with custom configuration replacing it later in the call.
After the SecurityContext has been established subseqeunt handlers can then add authentication mechanisms
to the context, to simplify this Undertow contains a handler called AuthenticationMechanismsHandler
this handler can be created with a set of AuthenticationMechanism mechanisms and will set them all on the
established SecurityContext. Alternatively custom handlers could be used to add mechanisms one at a time
bases on alternative requirements.
The next handler in the authentication process is the AuthenticationConstraintHandler, this handler is
responsible for checking the current request and identifying if authentication should be marked as being
required for the current request. This handler can take a Predicate
that makes a decision about if the request requires authentication.
The final handler in this chain is the AuthenticationCallHandler, this handler is responsible for
ensuring the SecurityContext is called to actually perform the authentication process, depending
on any identified constraint this will either mandate authentication or only perform authentication
if appropriate for the configured mechanisms.
There is no requirement for these handlers to be executed consecutively, the only requirement is that first
the SecurityContext is established, then the authentications and constrain check can be
performed in any order and finally the AuthenticationCallHandler must be used before any processing of
a potentially protected resource is called.
Security mechanisms that are to be used must implement the following interface: -
public interface AuthenticationMechanism {

    AuthenticationMechanismOutcome authenticate(final HttpServerExchange exchange, final SecurityContext securityContext);

    ChallengeResult sendChallenge(final HttpServerExchange exchange, final SecurityContext securityContext);
}
The AuthenticationMechanismOutcome is used by the mechanism to indicate the status of the attempted authentication.
The three options are:
-
AUTHENTICATED - The authentication was successful. No further methods will be tried and no challenge will be sent.
-
NOT_ATTEMPTED - There was not enough information available to attempt an authentication. The next mechanism will be tried. If this was the last mechanism and authentication is required then a challenge will be sent by calling the
sendChallengemethod on all the mechanisms in order. If authentication is not required then the request will proceed with no authenticated principal. -
NOT_AUTHENTICATED - The authentication failed, usually this is due to invalid credentials. The authentication process will not proceed further, and a new challenge will be sent to the client.
Regardless of if authentication has been flagged as being required when the request reaches the AuthenticationCallHandler the
SecurityContext is called to commence the process. The reason this happens regardless of if authentication is flagged as
required is for a few reasons:
-
The client may have sent additional authentication tokens and have expectations the response will take these into account.
-
We may be able to verify the remote user without any additional rount trips, especially where authentication has already occurred.
-
The authentication mechanism may need to pass intermediate updates to the client so we need to ensure any inbound tokens are valid.
When authentication runs the authenticate method on each configured AuthenticationMechanism is called in turn, this continues
until one of the following occurs:
-
A mechanism successfully authenticates the request and returns
AUTHENTICATED. -
A mechanism attempts but does not complete authentication and returns
NOT_AUTHENTICATED. -
The list of mechanisms is exhausted.
At this point if the response was AUTHENTICATED then the request will be allowed through and passed onto the next handler.
If the request is NOT_AUTHENTICATED then either authentication failed or a mechanism requires an additional round trip with the
client, either way the sendChallenge method of each defined AuthenticationMethod is called in turn and the response sent back
to the client. All mechanisms are called as even if one mechanism is mid-authentication the client can still decide to abandon
that mechanism and switch to an alternative mechanism so all challenges need to be re-sent.
If the list of mechanisms was exhausted then the previously set authentication constraint needs to be checked, if authentication was
not required then the request can proceed to the next handler in the chain and that will be then of authentication for this request
(unless a later handler mandates authentication and requests authentication is re-atempted). If however authentication was required
then as with a NOT_AUTHENTICATED response each mechanism has sendChallenge called in turn to generate an authentication challenge
to send to the client.
Predicates Attributes and Handlers
Introduction
Predicates and Exchange attributes are an abstraction that allow handlers to read, write and make decisions based on certain attributes of a request without hard coding this into the handler. These form the basis of Undertow’s text based handler configuration format. Some examples are shown below:
Use the reverse proxy to send all requests to /reports to a different backend server:
path-prefix['/reports'] -> reverse-proxy[{'https://reports1.mydomain.com','https://reports2.mydomain.com'}]Redirect all requests from /a to /b. The first example only redirects if there is an exact match, the later examples match all paths that start with /a:
path['/a'] -> redirect['/b']
path-prefix['/a'] -> redirect['/b${remaining}']
regex['/a(.*)'] -> set[attribute='%{o,Location}', value='/b${1}'] -> response-code[302]
Exchange Attributes
An exchange attribute represents the value of part of the exchange. For example the path attribute represents the request path, the method attribute represents the HTTP. Even though these attributes can be retrieved and modified directly this requires a handler to hard code the attribute that they wish to use. For example Undertow provides a handler that checks an attribute against an access control list. There are lots of different attributes we may wish to check against the ACL (e.g. username, User-Agent header, request path).
Predicates
A predicate is a function that takes a value (in this case the HttpServerExchange) and returns a true or false value.
This allows actions to be taken based on the return value of the predicate. In general any handler that needs to make
a boolean decision based on the exchange should use a predicate to allow for maximum flexibility.
The provided predicate handler can be used to make a decision between which handler to invoke based on the value of a predicate.
Programmatic Representation of Exchange Attributes
An exchange attribute is represented by the io.undertow.attribute.ExchangeAttribute interface:
/**
 * Representation of a string attribute from a HTTP server exchange.
 */
public interface ExchangeAttribute {

    /**
     * Resolve the attribute from the HTTP server exchange. This may return null if the attribute is not present.
     * @param exchange The exchange
     * @return The attribute
     */
    String readAttribute(final HttpServerExchange exchange);

    /**
     * Sets a new value for the attribute. Not all attributes are writable.
     * @param exchange The exchange
     * @param newValue The new value for the attribute
     */
    void writeAttribute(final HttpServerExchange exchange, final String newValue) throws ReadOnlyAttributeException;
}
Undertow provides implementation of a lot of attributes out of the box, most of which can be accessed using the
io.undertow.attribute.ExchangeAttributes utility class. Some of the attributes that are provided include request and
response headers, cookies, path, query parameters, the current user and more.
Programmatic Representation of Predicates
Predicates are represented by the io.undertow.predicate.Predicate interface:
/**
 * A predicate.
 *
 * This is mainly uses by handlers as a way to decide if a request should have certain
 * processing applied, based on the given conditions.
 */
public interface Predicate {

    /**
     * Attachment key that can be used to store additional predicate context that allows the predicates to store
     * additional information. For example a predicate that matches on a regular expression can place additional
     * information about match groups into the predicate context.
     *
     * Predicates must not rely on this attachment being present, it will only be present if the predicate is being
     * used in a situation where this information may be required by later handlers.
     *
     */
    AttachmentKey<Map<String, Object>> PREDICATE_CONTEXT = AttachmentKey.create(Map.class);

    boolean resolve(final HttpServerExchange value);

}
Undertow provides built in predicates that can be created using the io.undertow.predicate.Predicates utility class.
This includes basic boolean logic predicates (and, or and not), as well as other useful predicates such as path
matching (including prefix and suffix based matches), regular expression matching, contains and exists. Many of these
predicates operate on exchange attributes, so they can be used to match arbitrary parts of the exchange. The following
example demonstrates a predicate that matches any exchange that has no Content-Type header where the method is POST:
Predicate predicate = Predicates.and(
        Predicates.not(Predicates.exists(ExchangeAttributes.requestHeader(Headers.CONTENT_TYPE))),
        Predicates.equals("POST", ExchangeAttributes.requestMethod()));
Textual Representation
| Undertows predicate language is still considered tech preview. Its syntax will likely change in a future version as the language is expanded. |
All these attributes and predicates are all well and good, but unless there is a way for the end user to configure them without resorting to programmatic means they are not super useful. Fortunately Undertow provides a way to do just that.
Exchange Attributes
Exchange attributes may have up to two textual representations, a long one and a short one. The long version takes the form %{attribute}, while the short version is a percent sign followed by a single character. A list of the built in attributes provided by Undertow is below:
| Attribute | Short Form | Long Form |
|---|---|---|
Remote IP address |
|
|
Local IP address |
|
|
Bytes sent, excluding HTTP headers, or - if no bytes were sent |
|
|
Bytes sent, excluding HTTP headers |
|
|
Remote host name |
|
|
Request protocol |
|
|
Remote logical username from identd (always returns -) |
|
|
Request method |
|
|
Local port |
|
|
Query string (prepended with a ? if it exists, otherwise an empty string) |
|
|
First line of the request |
|
|
HTTP status code of the response |
|
|
Date and time, in Common Log Format format |
|
|
Remote user that was authenticated |
|
|
Requested URL path |
|
|
Request relative path |
|
|
Local server name |
|
|
Time taken to process the request, in millis |
|
|
Time taken to process the request, in seconds |
|
|
Current request thread name |
|
|
SSL cypher |
|
|
SSL client certificate |
|
|
SSL session id |
|
|
Cookie value |
|
|
Query parameter |
|
|
Request header |
|
|
Response header |
|
|
Value from the predicate context |
|
Any tokens that do not follow one of the above patterns are assumed to be literals. For example assuming a
user name of Stuart and a request method of GET the attribute text Hello %u the request method is %m will give
the value Hello Stuart the request method is GET.
These attributes are used anywhere that text based configuration is required, e.g. specifying the log pattern in the access log.
Some handlers may actually modify these attributes. In order for this to work the attribute must not be read only, and must consist of only a single token from the above table.
Textual Representation Predicates
Sometimes it is also useful to have a textual representation of a predicate. For examples when configuring a handler in Wildfly we may want it only to run if a certain condition is met, and when doing rewrite handling we generally do not want to re-write all requests, only a subset of them.
To this end Undertow provides a way to specify a textual representation of a predicate. In its simplest form, a
predicate is represented as predicate-name[name1=value1,name2=value2].
For example, the following predicates all match POST requests:
method[POST]
method[value=POST]
equals[{%{METHOD}, POST}]
equals[%m, "POST"]
regex[pattern="POST", value="%m", full-match=true]
Lets examine these a bit more closely. The first one method[POST] uses the built in method predicate that matches
based on the method. As this predicate takes only a single parameter (that is the default parameter) it is not necessary
to explicitly specify the parameter name. Also note that POST is not quoted, quoting is only necessary if the token
contains spaces, commas or square braces.
The second example method[value=POST] is the same as the first, except that the parameter name is explicitly specified.
The third and fourth examples demonstrates the equals predicate. This predicate actually takes one parameter that is an array, and will return true if all items in the array are equal. Arrays are generally enclosed in curly braces, however in this case where there is a single parameter that is the default parameter the braces can be omitted.
The final examples shows the use of the regex predicate. This takes 3 parameters, the pattern to match, the value to match against and full-match, which determines if the pattern must match the whole value or simply part of it.
Some predicates may also capture additional information about the match and store it in the predicate context. For example the regex predicate will store the match under the key 0, and any match groups under the key 1, 2 etc.
These contextual values can then be retrieved by later predicates of handlers using the syntax ${0}, ${1} etc.
Predicates can be combined using the boolean operators and, or and not. Some examples are shown below:
not method[POST]
method[POST] and path-prefix["/uploads"]
path-template[value="/user/{username}/*"] and equals[%u, ${username}]
regex[pattern="/user/(.*?)./.*", value=%U, full-match=true] and equals[%u, ${1}]
The first predicate will match everything except post requests. The second will match all post requests to /uploads.
The third predicate will match all requests to URL’s of the form /user/{username}/* where the username is equal to the
username of the currently logged in user. In this case the username part of the URL is captured, and the equals handler
can retrieve it using the ${username} syntax shown above. The fourth example is the same as the third, however it uses
a regex with a match group rather than a path template.
The complete list of built in predicates is shown below:
| Name | Parameters | Parameter Types | Default Parameter | Optional Parameters | Additional context |
|---|---|---|---|---|---|
contains |
value, search |
attribute, String[] |
|||
equals |
value |
attribute[] |
value |
||
exists |
value |
attribute |
value |
||
method |
value |
String[] |
value |
||
path |
path |
String[] |
path |
||
path-prefix |
path |
String[] |
path |
||
path-suffix |
path |
String[] |
path |
||
path-template |
value,match |
String, attribute |
value |
match=%R |
Path template elements under the name |
regex |
pattern, value, full-match |
String, attribute, boolean |
pattern |
value=%R,full-match=false |
Match groups under number |
Reverse Proxy
Undertow’s reverse proxy is implemented as a handler, and as such it can be used like any other handler.
An instance of the handler can be created using the io.undertow.Handlers#proxyHandler method. It takes two parameters,
a ProxyClient instance and the next handler to invoke if the client does not know how to proxy a request (often just
a handler that returns a 404). It is also possible to specify the maximum request time, after which time a request will
be terminated.
Undertow provides two instances of ProxyClient (there is a third one under development that has mod_cluster support).
Note that all proxy clients use the Undertow HTTP client API. At the moment this provides support for HTTP and AJP
backends.
The provided proxy clients are:
- io.undertow.server.handlers.proxy.SimpleProxyClientProvider
-
A proxy client that just forwards to another server. It takes the servers URI as a constructor parameter, and then will forward all requests to the target server. Connections are maintained on a one to one basis, a connection to the front end server results in a new connection to the back end server.
- io.undertow.server.handlers.proxy.LoadBalancingProxyClient
-
A load balancing proxy client that forwards requests to servers in a round robin fashion, unless sticky sessions have been enabled in which case requests with a session cookie will always be forwarded to the same server.
Target servers can be added to the client using the addHost method, which takes the server URI to connect to and an
optional node ID to use for sticky sessions.
The load balancing proxy maintain a pool of connections to each backend server. The number of connections in the pool is
determined by the parameter connectionsPerThread, which specifies the maximum number of connections per IO thread (so
to get the total number of connections multiply this by the number of IO threads). The reason why this pool is maintain
by thread is to make sure that both the frontend and backend connections use the same thread, so the proxy client
does not have to deal with threading issues.
In general the client connects to servers one after the other in a round robin fashion, skipping any servers that are
either full (i.e. all connections in the pool are in use) or in a problem state (which happens if a connection attempt
fails). Servers that are in the problem state will be queried every so often (controlled by problemServerRetry) to see
if they have recovered.
HTTP Upgrade (including websockets) is fully supported for HTTP based backends. When a HTTP upgrade occurs the connection is taken out of the pool and takes on a one to one relationship with the front end connection. Upgraded connections to not count towards the backend connection limit.
Websockets
Undertow provides support for Websockets out of the box. Undertow core provides a XNIO based API, which uses the Xnio Channel interface to provide access to the web socket at a low level.
Most users will want a higher level interface than this, and to that end Undertow also provides a JSR-356
implementation. This implementation is part of a separate jar, to use it you must make sure that you have the
undertow-servlet and undertow-websocket-jsr artifacts on your class path. Servlet support is required because the
JSR-356 API is based on the Servlet API.
For maven users the following snippet should be added to your pom.xml:
<dependency>
  <groupId>io.undertow</groupId>
  <artifactId>undertow-servlet</artifactId>
  <version>${version.io.undertow}</version>
</dependency>

<dependency>
  <groupId>io.undertow</groupId>
  <artifactId>undertow-websockets-jsr</artifactId>
  <version>${version.io.undertow}</version>
</dependency>
Undertow Servlet
Creating a Servlet Deployment
A simple example of how to create a Servlet deployment is the servlet example from the Undertow examples:
DeploymentInfo servletBuilder = Servlets.deployment()
        .setClassLoader(ServletServer.class.getClassLoader())
        .setContextPath("/myapp")
        .setDeploymentName("test.war")
        .addServlets(
                Servlets.servlet("MessageServlet", MessageServlet.class)
                        .addInitParam("message", "Hello World")
                        .addMapping("/*"),
                Servlets.servlet("MyServlet", MessageServlet.class)
                        .addInitParam("message", "MyServlet")
                        .addMapping("/myservlet"));

DeploymentManager manager = Servlets.defaultContainer().addDeployment(servletBuilder);
manager.deploy();
PathHandler path = Handlers.path(Handlers.redirect("/myapp"))
        .addPrefixPath("/myapp", manager.start());

Undertow server = Undertow.builder()
        .addHttpListener(8080, "localhost")
        .setHandler(path)
        .build();
server.start();
The basic process is to create a DeploymentInfo structure (this can be done use the io.undertow.servlets.Servlets
utility method), add any Servlets and other information to this structure, and then deploy it to a Servlet container.
After this is deployed you can call the start() method on the DeploymentManager which returns a HttpHandler than
can then be installed in an Undertow server handler chain.
The DeploymentInfo structure has a lot of data, and most of it directly corresponds to data in web.xml so it will
not be covered in this guide, instead this will focus on the elements that are Undertow specific.
Handler Chain Wrappers
Hander chain wrappers allow you to insert additional HttpHandlers into the Servlet chain, there are three methods that
allow you to do this:
- addInitialHandlerChainWrapper()
-
This allows you to add a handler that is run before all other Servlet handlers. If this handler does not delegate to the next handler in the chain it can effectively bypass the Servlet deployment.
- addOuterHandlerChainWrapper()
-
This handler is run after the servlet request context has been setup, but before any other handlers.
- addInnerHandlerChainWrapper()
-
This handler is run after the security handlers, just before the request is dispatched to deployment code.
Thread Setup Actions
Thread setup actions can be added using the addThreadSetupAction() method, these actions will be run before a request
is dispatched to a thread, so any thread local data can be setup.
The Resource Manager
The ResourceManager is used by the default servlet to serve all static resources. By modifying the resource manager
in use it is possible to pick where static resource are served from.
Authentication Mechanisms
The authentication mechanism to use is determined by the LoginConfig object. This maintains a list of mechanism names
and the mechanisms will be tried in order.
In addition to the built in mechanisms it is possible to add custom authentication mechanisms using the
addFirstAuthenticationMechanism() addLastAuthenticationMechanism() and addAuthenticationMechanism() methods.
The first and last versions of this method will both add a mechanism and add it to the LoginConfig object,
while the addAuthenticationMechanism() simply registers a factory for the given mechanism name. If you are trying
to create a general purpose authentication mechanism via a Servlet extension this is the method you should use, as it
means you can install your extension into a server for all deployments, and it will only be active for deployments
where the user has specifically selected your mechanism name in web.xml.
Servlet Extensions
Servlet extensions allow you to hook into the Servlet deployment process, and modify aspect of a Servlet deployment.
In some ways they are similar to ServletContainerInitializer or ServletContextListener, however they provides much
more flexibility over what can be modified.
In order to create a ServletExtension it is necessary to implement io.undertow.servlet.ServletExtension, and
then add the name of your implementation class to META-INF/services/io.undertow.servlet.ServletExtension. When
Undertow is deploying a Servlet deployment it will load all such services from the deployments class loader, and then
invoke their handleDeployment method.
This method is passed an Undertow DeploymentInfo structure, which contains a complete and mutable description of the
deployment, my modifying this structure it is possible to change any aspect of the deployment.
The DeploymentInfo structure is the same structure that is used by the embedded API, so in effect a ServletExtension has the same amount of flexibility that you have when using Undertow in embedded mode.
There are many possible use cases for this, a common one would be to add additional authentication mechanisms to a deployment, or to use native Undertow handlers as part of a Servlet deployment.
Examples
The deployment guide contains examples of how to use the DeploymentInfo API.
Using non-blocking handlers with servlet
When using servlet deployments in Undertow is is possible to mix and match servlets and Undertow native handlers.
This is achieved via the io.undertow.servlet.ServletExtension interface. This interface allows you to customise
a servlet deployment before it is deployed, including wrapping the servlet handler chain with your own handlers.
Lets get started. First we need a ServletExtension implementation:
package io.undertow.example.nonblocking;

import io.undertow.Handlers;
import io.undertow.server.HandlerWrapper;
import io.undertow.server.HttpHandler;
import io.undertow.server.handlers.PathHandler;
import io.undertow.servlet.ServletExtension;
import io.undertow.servlet.api.DeploymentInfo;
import io.undertow.servlet.spec.ServletContextImpl;

public class NonBlockingHandlerExtension implements ServletExtension {
    @Override
    public void handleDeployment(final DeploymentInfo deploymentInfo, final ServletContextImpl servletContext) {
        deploymentInfo.addInitialHandlerChainWrapper(new HandlerWrapper() {
            @Override
            public HttpHandler wrap(final HttpHandler handler) {
                return Handlers.path()
                        .addPrefixPath("/", handler)
                        .addPrefixPath("/hello", new HelloWorldHandler());
            }
        });
    }
}
Now we need a handler:
public class HelloWorldHandler implements HttpHandler {
    @Override
    public void handleRequest(final HttpServerExchange exchange) throws Exception {
        exchange.getResponseHeaders().put(Headers.CONTENT_TYPE, "text/plain");
        exchange.getResponseSender().send("Hello World");
    }
}
We now need to register this extension. This uses to standard java service loader mechanism, so we need to create a
WEB-INF/classes/META-INF/services/io.undertow.servlet.ServletExtension file that contains the name of our extension
class.
Now when you deploy your war to Wildfly you should be able to navigate to /mywar/hello and your custom handler will be
invoked.
Lets see exactly what is going on here. When the deployment is about to deploy the handleDeployment method is
invoked. This method is passed the io.undertow.servlet.api.DeploymentInfo structure, that contains a complete
description of the deployment. One of the things that this contains is a list of handler chain wrappers. These wrappers
allow you to add additional handlers before the servlet handler.
In our wrapper we create an io.undertow.server.handlers.PathHandler, which is a handler provided by undertow that
maps handlers to paths. We register two different handlers into the path handler, our custom handler under /hello,
and the servlet handler under /. These paths are relative to the root of the servlet context (techinically they are
relative to the last resolved path, so if you chain two path handlers together the second paths will be resolved relative
to the first one).
In our handler we simply set a Content-Type header and then send a "Hello World" response via async IO.
A slightly more complex example
Say we are serving up an application, and we decide that we would like to serve all our .js and .css files using an
async handler, as we want to avoid the overhead of a servlet request.
To do this we are going to create a handler that checks the extension on the incoming request, and if it is .js or
.css then it will serve the file directly, bypassing servlet all together.
| This will bypass all servlet handlers, including security handlers, so security rules will not be applied for these handlers. |
public class NonBlockingHandlerExtension implements ServletExtension {
    @Override
    public void handleDeployment(final DeploymentInfo deploymentInfo, final ServletContextImpl servletContext) {
        deploymentInfo.addInitialHandlerChainWrapper(new HandlerWrapper() {
            @Override
            public HttpHandler wrap(final HttpHandler handler) {

                final ResourceHandler resourceHandler = new ResourceHandler()
                        .setResourceManager(deploymentInfo.getResourceManager());

                PredicateHandler predicateHandler = new PredicateHandler(Predicates.suffixs(".css", ".js"), resourceHandler, handler);

                return predicateHandler;
            }
        });
    }
}
Lets go through this line by line:
final ResourceHandler resourceHandler = new ResourceHandler()
    .setResourceManager(deploymentInfo.getResourceManager());
A resource handler is a handler provided by Undertow that serves resources from a resource manager. This is basically just an abstraction that allows us to re-use the file serving code no matter where a file in coming from. For example undertow provides several default resource manager implementations:
- io.undertow.server.handlers.resource.FileResourceManager
-
A resource manager that serves files from the file system
- io.undertow.server.handlers.resource.ClassPathResourceManager
-
A resource manager that serves files from the class path
- io.undertow.server.handlers.resource.CachingResourceManager
-
A resource manger that wraps another resource manger, and provides caching.
You do not need to worry about what type of resource manager is in use here, all you need to know is that this is the resource manager that is being used by the default servlet, so serving files from this resource manager will mirror the behaviour of the default servlet.
We now need to wire up our resource handler so it is only used for .js and .css. We could simply write a handler
that checks the file extension and delegates accordingly, however Undertow already provides us with one:
PredicateHandler predicateHandler = new PredicateHandler(Predicates.suffixs(".css", ".js"), resourceHandler, handler);A PredicateHandler chooses between two different handlers based on the result of a predicate that is applied to the
exchange. In this case we are using a suffix predicate, that will return true if the request ends with .js or .css.
When this predicate returns true our resource handler will be invoked, otherwise the request will be delegated to the servlet container as normal.
Servlet Security
As well as support for the standard servlet spec required authentication mechanisms, Undertow also allows you to create your own mechanisms, and provides an easy way to make the accessible to an end user.
Securing a Servlet Deployment
Undertow provides full support for all security constructs specified in the Servlet specification. These are configured
via the DeploymentInfo structure, and in general closely mirror the corresponding structures as defined by annotations
or web.xml. These structures are not detailed fully here, but are covered by the relevant javadoc.
If you are using Wildfly then then it is possible to configure multiple mechanisms using web.xml, by listing the
mechanism names separated by commas. It is also possible to set mechanism properties using a query string like syntax.
For example:
<auth-method>BASIC?silent=true,FORM</auth-method>The mechanisms will be tried in the order that they are listed. In the example silent basic auth will be tried first,
which is basic auth that only takes effect if an Authorization header is present. If no such header is present then
form auth will be used instead. This will allow programatic clients to use basic auth, while users connecting
via a browser can use form based auth.
The built it list of mechanisms and the properties they take are as follows:
| Mechanism Name | Options | Notes | |
|---|---|---|---|
BASIC |
silent (true/false) |
Silent mode means that a challenge will only be issued if an |
|
FORM |
|||
CLIENT-CERT |
|||
DIGEST |
|||
EXTERNAL |
Used when authentication is being done by a front end such as httpd |
Selecting an Authentication Mechanism
The authentication mechanism is specified via the io.undertow.servlet.api.LoginConfig object that can be added using
the method DeploymentInfo.setLoginConfig(LoginConfig config). This object contains an ordered list of mechanism names.
The Servlet specification only allows you to specify a single mechanism name, while Undertow allows as many as you want
(if you are using Wildfly you can make use of this by using a comma separated list of names in web.xml, and pass
properties using a query string like syntax, for example BASIC?silent=true,FORM).
The mechanisms are standard Undertow AuthenticationMechanism implementations, and it should be noted that not all
mechanisms are compatible. For example trying to combine FORM and BASIC does not work, just because they both require
a different response code. Combining FORM and silent BASIC will work just fine however (silent basic auth means that
if the user agent provides an Authorization: header then BASIC auth will be used, however if this header is not
present then no action will be taken. This allows scripts to use basic auth, while browsers can use form).
When adding the mechanism name to the LoginConfig structure it is also possible to specify a property map. Custom
authentication mechanisms may use these properties however they wish. The only built in mechanism that makes use of this
mechanism is basic auth, which if passed Collections.singletonMap("silent", "true") will enable silent mode as
described above.
The built in mechanisms are FORM, DIGEST, CLIENT_CERT and BASIC.
Adding a Custom Authentication Mechanism
Custom authentication mechanisms are added using the Undertow ServletExtension mechanism. This provides a way
to hook into the Undertow deployment process, and add any additional mechanisms.
These extensions are discovered via the standard META-INF/services discovery mechanism, so if you have a jar that provides a custom authentication mechanism all that should be required is to add this jar to your deployment and then specify the mechanism name in web.xml.
For more info see the Servlet extensions guide.
Advanced Servlet Use Cases
As well as allowing you to add all the standard Servlet constructs that you would expect (such as Servlets, Filters etc), Undertow also allows you to customise your deployment in a number of ways. This section details these additional options.
| This section does not cover all the different options available in the DeploymentInfo structure. For a complete reference please refer to the javadoc. |
Inserting Custom Handlers into the Servlet Handler Chain
It is possible to insert customer handlers into various parts of the servlet handler chain. This is done by adding a
io.undertow.server.HandlerWrapper to the DeploymentInfo structure. This will be called at deployment time and allows
you to wrap the existing handler.
There are three possible places where a handler can be inserted:
- Before the Servlet Chain
-
This happens before any Servlet handlers are invoked, and handlers inserted here have the option of completly bypassing Servlet altogether. Some possible use cases include serving static files directly without any Servlet overhead, or performing some kind of request re-writing before Servlet is invoked. To add a wrapper here use
DeploymentInfo.addInitialHandlerChainWrapper(HandlerWrapper wrapper). - After the Servlet Initial Handler
-
This happens after the initial Servlet handler is invoked. The request has been dispatched to a worker thread, request and response objects have been created, the target servlet has been resolved and all relevant info has been attached to the exchange as part of the
ServletRequestContext. No security handlers have been invoked at this stage. To add a wrapper here useDeploymentInfo.addOuterHandlerChainWrapper(HandlerWrapper wrapper). - After the Security Initial Handlers
-
This happens after the Security handlers have been invoked, before the request is dispatched to the first Filter or Servlet.
To add a wrapper here use DeploymentInfo.addInnerHandlerChainWrapper(HandlerWrapper wrapper).
Thread Setup Actions
Thread setup actions allow you to perform tasks before and after control is dispatched to user code. The most common
use for this is to set up thread local contexts. For example a server might want to setup the appropriate JNDI contexts
before control is passed to user code, so make sure the code has access to the correct java:comp context.
Thread setup actions can be added using DeploymentInfo.addThreadSetupAction(ThreadSetupAction action).
Ignore Flush
In Servlet code it is common to see code that looks like this:
public class SomeServlet extends HttpServlet {

    @Override
    protected void doGet(final HttpServletRequest req, final HttpServletResponse resp) throws ServletException, IOException {
            OutputStream stream = resp.getOutputStream();

            //do stuff

            stream.flush();
            stream.close();
        }
    }
}
While this seems reasonable at first glace it is actually terrible from a performance point of view. The flush() call
before the close() call forces content to be written to the client, which will generally force chunked encoding. The
following close() call then writes out the chunk terminator, resulting in another write to the socket. This means that
a response that could otherwise have been written out using a single write call using a fixed content length now takes
two and uses chunked encoding.
To work around this poor practice Undertow provides an option to ignore flushes on the ServletOutputStream. This can
be activated by calling DeploymentInfo.setIgnoreFlush(true). Even though flush() will no longer flush to the
client when this is enabled Undertow will still treat the response as commited and not allow modification of the headers.
JSP
JSP can be used in Undertow through the use of the Jastow project, which is a fork of Apache Jasper for use in Undertow (note that fork is used very loosely here, it is basically just Jasper with its Tomcat dependencies removed).
Jasper provides all its functionality though a Servlet, as a result can be added to a standard Undertow servlet deployment by adding the JSP servlet to the *.jsp mapping.
There are also some additional context parameters that JSP requires, and Jastow provides a helper class to set these up.
An example of how to set up a JSP deployment is shown below:
final PathHandler servletPath = new PathHandler();
final ServletContainer container = ServletContainer.Factory.newInstance();

DeploymentInfo builder = new DeploymentInfo()
        .setClassLoader(SimpleJspTestCase.class.getClassLoader())
        .setContextPath("/servletContext")
        .setClassIntrospecter(TestClassIntrospector.INSTANCE)
        .setDeploymentName("servletContext.war")
        .setResourceManager(new TestResourceLoader(SimpleJspTestCase.class))
        .addServlet(JspServletBuilder.createServlet("Default Jsp Servlet", "*.jsp"));
JspServletBuilder.setupDeployment(builder, new HashMap<String, JspPropertyGroup>(), new HashMap<String, TagLibraryInfo>(), new MyInstanceManager());

DeploymentManager manager = container.addDeployment(builder);
manager.deploy();
servletPath.addPrefixPath(builder.getContextPath(), manager.start());
Note that JSP tags are created using an instance of the Jasper InstanceManager interface. If you do not require injection
into tags then this interface can simply create a new instance using reflection.
FAQ
Undertow FAQ
Here is a list of frequently asked questions.
Why does the world need another web server?
Before we created Undertow we needed multiple web server technologies to meet our needs. Undertow was designed to be flexible and efficient enough to meet every use case we had and every use case we could think of. Undertow is embeddable and easy to use, but is also well suited for application servers. It has great performance, but also rich enterprise Java capabilities. It has efficient non-blocking reactive APIs, but also more familiar traditional blocking APIs. It has new innovative APIs, but also standard APIs. It can run large dynamic applications, but is also lightweight enough to replace a native web server.
Why am I only seeing one request being processed at a time?
Some browsers share connections between tabs, so even if you have opened another tab the second tab will not load until the first tab has completed.
When will Undertow be included in JBoss EAP?
Undertow is currently planned for EAP7, which will be based on a future WildFly release. It can be used today on its own or within WindFly 8.
How do I build Undertow?
-
git clone git://github.com/undertow-io/undertow.git
-
cd undertow
-
mvn install
How do I get started?
A good starting point is taking a look at our examples.
Where can I get help?
A number of the developers and users hang out on IRC at #undertow on irc.freenode.org. We also have a mailing list you can subscribe to. Finally, if you are using Undertow in WildFly you can use the general WildFly project forum as well.
Why isn’t Undertow based on Mina, Netty, RNIO, Grizzly, or <insert network framework>?
In order to best achieve its goals, Undertow requires very close integration with the underlying I/O infrastructure in the Java platform. The simplicity offered by any abstraction comes from hiding the underlying mechanisms behind it. However, the dilemma is that building an extremely efficient and flexible web server requires customization and control of these mechanisms. Undertow attempts to strike the right balance by reusing a minimalistic I/O library, XNIO, that was created for WildFly’s remote invocation layer.
XNIO allows us to eliminate some boiler plate, and also allows for direct I/O integration with the operating system, but it does not go further than that. In addition, XNIO offers very strong backwards compatibility which is important since this is also a concern for the Undertow project. Of course, other projects may have different needs, and thus might make different choices.